Textiles and Clothing by Kate Heintz Watson (good books for 7th graders txt) 📕
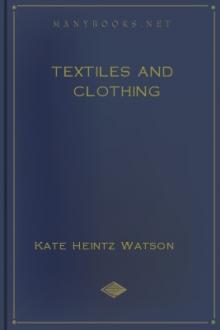
[Illustration: FLY SHUTTLE HAND LOOM.
The Pulling of the Reed Automatically Throws the Shuttle Back and Forth and Works the Harness, Making a Shed at the Proper Time.]
[Sidenote: Primitive Fabrics]
No textiles of primitive people were ever woven in pieces or bolts of yards and yards in length to be cut into garments. The cloth was made of the size and shape to serve the particular purpose for which it was designed. The mat, robe, or blanket had tribal outlines and proportions and was made according to the materials and the use of common forms that prevailed among the tribes. The designs were alway
Read free book «Textiles and Clothing by Kate Heintz Watson (good books for 7th graders txt) 📕» - read online or download for free at americanlibrarybooks.com
- Author: Kate Heintz Watson
- Performer: -
Read book online «Textiles and Clothing by Kate Heintz Watson (good books for 7th graders txt) 📕». Author - Kate Heintz Watson
Read Carefully. This test consists of two parts,—answers to the questions and the making of models. Both should be sent to the School for inspection and correction. All models should be made about 4 by 6 inches so that they may be put into the envelope provided without being folded. Two series of models are given; either or both may be made.
1. What instruction have you ever had in sewing?
(b) Has the subject any educational value?
2. What are the common basting stitches, and for what are they used?
3. Can you make the running stitch properly? How is it done?
4. For what purpose may the cat stitch be used?
5. Hems and Seams: Describe the different kinds for thick and thin materials, including those for flannel and state when they should be used.
6. Describe three kinds of plackets.
7. How are gathers made, and how sewed into a band?
8. What can you say of fastenings?
9. With what sewing machine are you most familiar, and what are its peculiarities?
10. What stitches or methods described in this lesson are new to you?
Note: After completing the answers, sign your full name.
MODELS, FIRST SERIESI. Stitches. On a piece of cotton about 4 by 6 inches, make with colored thread (1) a line of even basting stitches, (2) uneven basting stitches, (3) tacking, (4) running, (5) back stitch, (6) running and back, (7) half back.
With embroidery silk make a row each of (1) cat stitch, (2) single feather, (3) double feather, (4) chain, (5) rows of French knots with border of outline stitch.
Make your initial in one corner, using any stitch preferred.
Overcast one long edge of the model, double overcast the opposite side, finish one end with plain loop or blanket stitch, and the other end with some fancy loop stitch. Fasten all threads as described in the text.
II. Seams and Hems. (a) Join two pieces of fine cotton with a French seam at the long edge, about 2 by 5-1/2 inches, with warp running lengthwise. (b) Cut a piece of muslin on a true bias and attach the bias edge to a with a felled seam. (c) Trim the model and hem all sides so that the finished model may measure 4 by 6 inches.
III. Darning and Patching. (a) In gingham or figures cotton, make an underset patch of a square hole, matching the goods. (b) Darn a three-cornered tear.
IV. Fastenings. The proper distance from the edge of folded goods make (a) button hole, one end rounded and the other finished with a bar tack. (b) Under it make a partly finished, barred buttonhole. (c) Below this make an eyelet hole, (d) below the eyelet hole a loop, and sew on an eye.
On a second piece of folded goods opposite the first buttonhole, (a) sew a four-hole button, corresponding in size to the buttonhole. (b) Opposite the second buttonhole sew on a two-hole button; (c) below, sew on two hooks corresponding in position to the loop and eye. Make the two parts of the model so that the corresponding fastenings will join.
V. Apron. Using fine muslin, make a doll's apron, gathering into band at top. Above hem at the bottom, make two clusters of tucks of three each.
MODELS. SECOND SERIES. FOR EXPERIENCED WORKERSI. Rolled Hem; Hem Stitching. Make a doll's apron of fine muslin, attach top to band with rolled, whipped gathers. Make two clusters of tucks of three each at the bottom and hem stitch the bottom hem.
II. Sleeve Placket. Make a taped sleeve placket as shown in the illustration.
III. Make a Slot Seam, using dress goods and finish with an arrow head. (b) Make a large cloak buttonhole.
IV. Mitre Embroidery and finish as shown in the illustration. (b) Match and join the same.
V. Embroidery: Make something small and useful—a doily, stock, collar—illustrating some style of embroidery, or make a model of the first series which will afford you the most new experience.
The greatest obstacle to home sewing of any kind is the failure to provide suitable materials with which to do the work. To do good work—to make attractive gowns—the simple tools which the work requires must be provided. First, there should be needles and pins of the best quality and make. They should be fine and well pointed. The needle should be suitable to the material to be sewn and sufficiently large to carry the thread easily. A blunt or bent needle should never be used. Long or milliner's needles are preferred by many for basting.
A good supply of thread should be kept on hand—not too great a quantity, but the stock should be added to as it is used. There should be both silk and colored cotton, also twist for button holes, loops and arrow heads and knitting silk to sew on and finish feather bone.
Two pairs of scissors are required—one with long, sharp blades, and a pair of medium sizes for snipping machine stitches.
Among the other necessary articles are a tape measure, cake of wax, pencils or tailor's chalk, tracing wheel, emery, lap board.
Canvas, scrim, or any like material should be kept in the sewing room, as these are invaluable for facings, linings of collars, cuffs, etc. Hooks, eyes, buttons, tape, linings, featherbone and shields are requisites not to be forgotten.
Tape is constantly needed. Linen tape is thinner and makes a neater finish for some purposes than cotton tape. The bias tape or binding now kept by the larger stores is very useful for binding curved edges and for other purposes.
If a regular cutting table is not available, the dining room table should be used. Skirts, bodices, ruffles, and bias bands should be cut on firm, even, and large surfaces. If cut upon the floor or bed and pressed on a coarse crash towel, the garment will have the undesirable home-made look.
A good pressing board should be provided and if possible a sleeve board. In the process of garment making of any kind too much stress cannot be laid upon constant and careful pressing.
The ironing board should have for its outside cover a finely woven, perfectly smooth cloth, tightly stretched, free from wrinkles, and securely tacked.
Where there is gas, a small, portable stove should be kept near the sewing table with a medium-sized flat iron. Lacking gas, one of the single burner oil stoves may be used. An electric flat iron is especially convenient.
A bust form is a great convenience in fitting and almost a necessity for one who does much home dressing. These may be purchased at department stores. Some kinds are adjustable, but it is always best to make a carefully fitted lining for it and pad out to the correct shape and size. The pattern should be one that extends well over the hips and heavy unbleached muslin may be used. After padding firmly, the front opening should be oversewed. Special care should be taken with shoulders and neck and the neck band should be carefully adjusted on the figure.
A padded sleeve lining is also very useful in making sleeves.
Dressmaking never should be begun until each needed article required for the work has been purchased. The sewing room should be in order; the machine well oiled and wiped before any work is undertaken.
If the finished garment is to be perfect, careful attention must be given to every detail of the cutting and making up. To possess mechanical skill alone is not sufficient. A successful garment depends not only upon the dexterity with which the worker manipulates the actual tools of her craft, but upon all her faculties and her power of applying them. She must have a comprehension of the laws of beauty in dress, construction, ornament, color, selection, economy. The artisan knows the technical part only, and looks upon each dress—each piece of lace and velvet—as so much material to be snipped and cut and sewed, copying from the fashion plate, making gown after gown alike. The artist, on the other hand, makes the gown to suit the individual wearer, considering each dress no matter how simple—and the simpler, the more artistic—as a creation designed to suit the woman for whom it was planned.
People who study economy from principle will never adopt anything extreme in weave, or color, or make. These extreme fashions are never lasting; they are too conspicuous and are vulgarized by bad copies, while a thing which is known to be good and beautiful once will remain so for all time. Those who are beginners in the art of dressmaking should select plain designs until skill is acquired. The making up and finishing of new fabrics and new or untried methods are problems that often dismay even the most experienced dressmaker.
PATTERNSThe makers of good and reliable patterns are many. Always buy patterns of firms that make proportion of figure as well as fashion a study. These patterns state length of skirt, waist and hip measure and quantity of material required in all widths. Buy a skirt pattern with correct hip size, as it is much more difficult to change this than to alter the dimensions of a waist. Adjust the pattern to the figure for which the garment is to be cut and see that it is right in all of its proportions. Always follow the notches indicated in the seams of the pattern, and thus avoid putting wrong pieces together. Be sure that the pattern is placed correctly upon the material with the straight grain or warp threads of the goods running directly on a line with the straight perforations indicated in the pattern. Lay the entire pattern upon the cloth. This gives an idea just where every piece is to come out.
All patterns give one-half of the bodice and the skirt, from center of back to center of front. The plain waist pattern consists of back, curved side piece, under arm piece (sometimes these two pieces are in one) front, upper and under sleeve, collar or neck band. Some patterns allow for seams—others do not. Skirt patterns give only one-half of the front gore. The seam edges of front gore are marked by one notch near the waist line. The front or straight edge of the first side gore has one notch, and two on the back edge of side gore. All the gores may be distinguished from the edges of the back gores by the lesser number of notches. This is true of all skirt patterns. If the patterns are studied carefully, all skirt cutting becomes very easy.
The object of goring a garment is to take out unnecessary fullness at the top; reducing the weight, making the garment less clumsy, and giving a nicety of finish which could not be done in heavy material if all the goods were left to fit into a band. Skirts may be lined or unlined, gored or full.
SEVEN-GORED SKIRTThe style may vary with the fashion, but a well-fitting skirt should hang even around the bottom edge, should fit easily around the hips without being strained or defining the figure too closely, or "ride up" when sitting, should flare slightly from hips to the bottom of the skirt, should not fall in between the feet, the back should fall well behind the figure. For heavy goods, as little material as possible consistent with the prevailing style should


Comments (0)